We are glad to launch new free Android application Spider VPN!
You can download and install it to your Android device.
Please let us know if you have any question or suggestion.
Enjoy your Internet freedom with Spider VPN!

Safe and Secure VPN Service
We are glad to launch new free Android application Spider VPN!
You can download and install it to your Android device.
Please let us know if you have any question or suggestion.
Enjoy your Internet freedom with Spider VPN!
You can use Spider vpn on different devices with MAC Operational System.
To make a new vpn connection in your MAC OS device you need to do the next:
1. Click the Apple logo, and select System Preferences

2. Click on the Network icon under Internet & Network

3. If you see a locked padlock in the bottom left, click on it. Otherwise skip to step 5.

4. Enter your password in the dialog box
5. Click on the little + icon just above the padlock

6. Select VPN From the interface drop down.

7. Select PPTP From the VPN Type drop down

8. Enter the name Sahrzad and click Create

9. Enter the Server Address that Sahrzad sent you, and your username.
Server address must be exactly as in your account data (without http://, www or any other symbols)
Also check the box that says Show VPN status in menu bar

10. Click on the Authentication Settings button, and enter your password

11. Click Advanced button and tick ‘Send all traffic over VPN connection’.

12. Click Apply button to save all the changes.

13. In the top right of your screen, click the token icon that looks like this. From that, a menu will drop down. Click on the Connect link for your company name. This will initiate the VPN connection.

14. If all is well, after a few seconds you will be connected, and a timer will start showing you how long you have been connected

You can use Spider VPN on your PC with Windows 8 Operational System.
To setup vpn connection in Windows 8 please follow the next instructions:
1. Display the Charms bar, click Search, and then click Settings.
2. Type VPN into the Search box.
3. Click the Set Up a Virtual Private Network (VPN) Connection button in the Search results pane.

4. The VPN Connection wizard appears. Enter the following information:

5. Click Create.

VPN tunnel is created and Windows 8 displays it under the Networks heading in the Charms bar. Click on it to connect.
You can use Spider VPN on your iPhone, ipad or other iOS device.
To create a new vpn connection in yourgadget with iOS you need to follow the next steps:
1. Go to Settings > General > VPN

2. Click Add VPN Configuration

3. Choose PPTP VPN and enter you Spider VPN account data. You will receive your VPN server, username and password in the e-mail from our service.
Server address must be exactly as in your account data (without http://, www or any other symbols)

4. Save your VPN configuration. Once you have created VPN connection you can switch it ON and OFF on the main settings screen

After you made vpn connection you can switch it on and off on the main settings screen.
To setup vpn in your Android device you can simple download our Spider VPN application for Android.

Also you can setup vpn connection using Android OS settings.
To create new vpn conenction in your Android device you need to do the next:


For connection to vpn server:
When you are connected to VPN, you will see an ongoing notification in the Status bar on your Android device. If you are disconnected, you will receive a notification and an option to go back to the VPN settings section.
Once you have created vpn connection you can switch it on and off on the main settings screen.

Last Update: June 12 2016.
The Great Firewall of China has been blocking more than 2,700 websites for years, and they are still continuously adding more blocked websites. The list of banned websites in China includes Google, YouTube, tons of Wikipedia pages, Facebook, LinkedIn, and Twitter. Skype a is allowed in China, but its version is different from the international version. Line and many others popular VOIP services are blocked in the country. As of 2013, the more than two million people have been closely monitoring Internet activities. This is why you should choose a very reliable VPN service.
Generally speaking, a VPN (Virtual Private Network) allows you to bypass any kind of Internet firewalls including China’s Great Firewall. This means you can easily have access to any website you want. While there are other ways to unblock restricted sites in China, VPN is considered the best option. With VPN for China, your online activities are encrypted so almost no one can intercept them. The level of security you can enjoy depends on the VPN you need. But obviously, you need to pay more for a higher level.
China has no laws against VPNs, but they have blocked a lot of websites of VPN service providers. OpenVPN, which allows users to different ports for bypassing firewalls, was blocked in China sometime between 2011 and 2012. There are also VPNs that are being partially blocked by the Chinese government. For this reason, you should be very careful in choosing a VPN service provider. But again, VPN remains to be far more reliable way to surf the Internet anonymously as compared to the others.
You should also understand that the Great Firewall of China is constantly being updated, which means China gets stricter as time passes by. So, if your traffic is not encrypted the way VPN does, you will only waste your time and money. Apparently, there are also free VPNs and you can also use them. But for obvious reasons, you don’t expect a free service winning against China’s very strict policies. You will also encounter tons of advertisements simply because it needs money for its operational expenses.
So, if you really want to have an access to blocked sites in China, you have to invest money. After all, there are many paid VPNs that offer very affordable service fees but can meet your requirements. The key here is to know first what you really need in a VPN. What websites do you want to visit? Are you going to visit them frequently? Will you also watch videos? Will you use it for your personal needs only? If have a business, will you allow your employees use VPN too? How much is your budget?
When choosing a VPN for China, make sure it can provide immediate customer support. To reduce downtime, choose also the one that can instantly provide you a new IP address in case the first one was blocked. These days, VPNs are already applicable to smartphones. But some of them only work well for iOs but not for Android. So, make sure your VPN has been tested for all operating software. Lastly, your VPN provider should always make regular updates and does not keep users’ log details.
To setup a new vpn connection in Windows 7 you need to do these simple steps.
1. Go to your desktop.
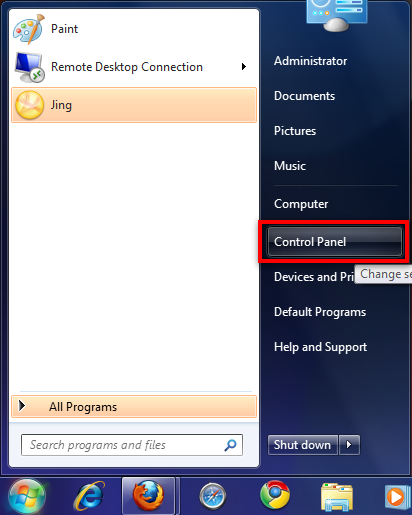
2. Once at your desktop click on your Start menu button, and select the Network tab.
3. Once the Control Panel window appears click the “Network and Internet” icon
4. When the Network and Internet window appears, please click on the “Set up a new connection or network” link

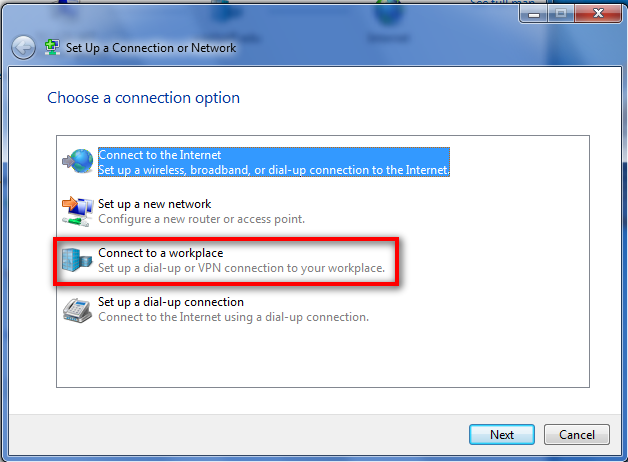
5. Scroll down to the bottom of the window and highlight the “Connect to a workplace” icon (highlighted by the red rectangle), then click the next button
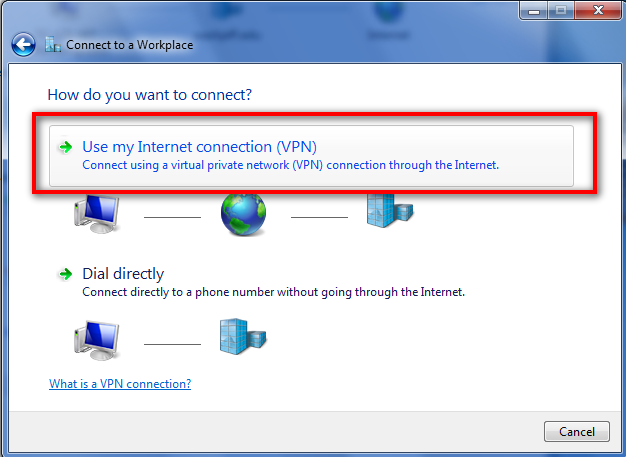
6. Picture 1, this window will show when you have no existing connections to other networks. Double click the icon that says “Use my internet connection (VPN)”
Picture 2, this window will appear if you have an existing connection to other networks, don’t worry this will not affect your ability to connect to the W&J network, leave the “no, create a new connection” balloon selected and click the next icon in the bottom right of the window.

7. A window should appear, in the “Internet Address” bar type vpn server address In the “Destination Name” bar, you may name the network anything you like, type “VPN Connection” The balloon highlighted by the yellow box can be turned on or off depending on how many people use your computer, I have clicked mine on because I am the only user on my computer. If you choose to turn this on a Windows Security window will appear, when it appears please click the “allow” area or the “continue” button. Then click the balloon next to the text “Do not connect now, just set it up so I can connect later” Then click the “next” button in the bottom right of the window.

8. In this window type in your username and password. We would suggest leaving the “remember my password” balloon for security reasons. Then click the “create” button in the bottom right of the window.

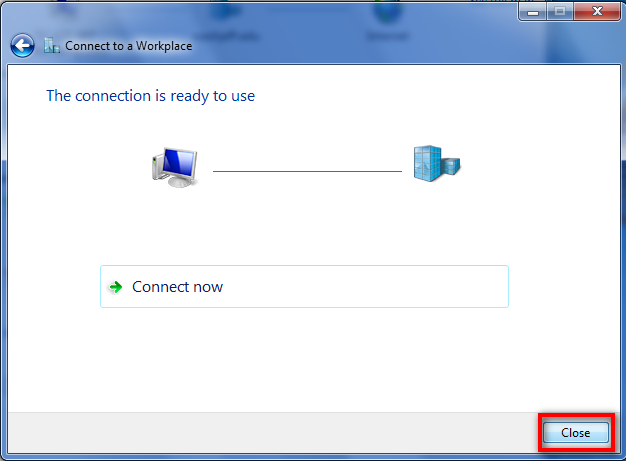
9. On the next window please refrain from clicking the connect now icon, please close the window and pull up “Connect to” window (if you click the start button again and look one tab beneath the “networks” tab you will see the “Connect to” shortcut).
10. Please on the “Connect to a network” link in the Network and Internet window, and a small window should appear in the bottom right of your screen (looking something like the second picture of this step) In the window, which appears after you click the “Connect to a network” link, please right click the connection we just crated and selected the properties option.


11. Please match the options tab with the picture below, to make sure everything is in the correct set-up. Once everything looks identical please click on the Security tab at the top of the window

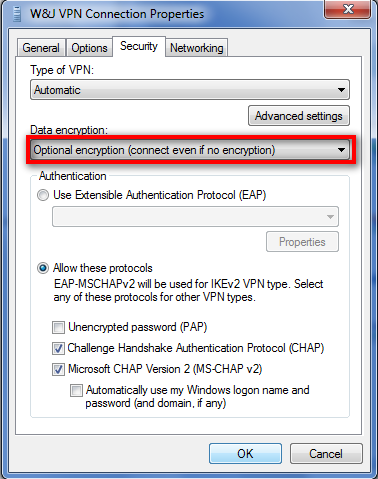
12. Again please make sure that your window looks the same as the one in the picture below.
13. Now click on the networking tab at the top of the window. Please match up the window to look the same as the one shown. Then click the “ok” button on the bottom of the window.

14. Please either right click on the connection and select connect or double click on the network that we have been working on, to connect to it.

15. A window will appear that again asks you for your username and password. Once you have entered those two items, you may click the “connect” button in the bottom left of the window.

You are now connected to the VPN server through a secure VPN connection. If you are getting connection errors, or getting disconnected constantly from the vpn, please contact us via the support email and we will do our best to troubleshoot your issue
Welcome to Spider VPN Service!
We offer you fast and secure premium vpn accounts for affordable prices.
Discounts and special offers, sales and coupon codes will help you to get spider vpn for very cheap price.